January 31, 2010

Happy Mail... and a BIG GIVEAWAY!!!

Good Morning!

For those of you wondering WHERE on Earth my JUGS post is...it's coming -- some HUGE tehnical difficulties this weekend!   But let's move on to the reason for TODAY'S post!

It's release day over at My Time Made Easy!!

OODLES AND OODLES of great stuff coming out today!

You'll see some of what you can order TODAY on my blog, as well as the rest of the Design Team!

My project today is using the Happy Mail template -- isn't it SO cute?  Yes, I know - "what's new about a mailbox?"  But really - how many $$'s have you spent on those target mailboxes??  Now, by spending $5, you can make AS MANY AS YOU WANT out of Cardstock -- which is a LOT less than $1 a sheet.


This whole ensemble (box and card) used 1 sheet of 12x12 cs, 1 8.5x11 sheet of designer paper and a 1/2 sheet (with some to spare) of 8.5x11 cs and some scraps.  Seriously.  It doesn't get much better than that!!

Since I use the Cricut Expression with my Sure Cuts a Lot software, it makes it SUPER easy, especially if I want to make it bigger too!  With the option to use up to a 12x12 sheet of CS - that could make a really nice sized mailbox!!  Soooooo, I'm sure you're wondering what the giveaway is...well, Canda over at Candacraft is SO AWESOME -- she's giving me a copy of Sure Cuts a Lot to GIVE AWAY to one of YOU!  Yes -- you heard me!!  lol.  All you need to do, is post a comment on this blog post any time between now and 11:59pm EST on Friday, February 5.  The winner will be chosen at random.  Isn't that COOL???  If you have a Cricut, and don't have this software - you NEED it!  And here's your chance to get it for FREE -- Thanks CANDA!

Now - let's get back on track...

I decided to do a little baby gift set.  The mailbox would hold a newborn onesie rolled up, or some baby socks.  These projects use the new stamp set, "You've Got Mail" it's so cute and versatile - I can't wait to show you a card I made with it later this week!

The mailbox is trimmed with some lacy trim I picked up at Hobby Lobby the other day, and there's a filigree brad (SU!) holding the flag to the mailbox.

I used some great CS from Couture Cardstock, and that DELICIOUS patterned paper is from a NEW collection from My Time Made Easy called 'A Loving Heart'.  Kristin did a FAB job on these papers...this navy one is my favorite!!

Thanks for stopping by today, don't forget to see what else the design team has created for you today - some of the girls are showing off another template available today -- so make sure you hop around!!


January 29, 2010

WHAT?!?!

WOW - where did the week go????

I can hardly believe it's the weekend again already, but boy am I glad!

Just wanted to pop in real quick and let you know about a FANTASTIC giveaway over at Lauren's blog!

She's offering the chance at winning the entire February release from My Time Made Easy WHOO HOOO!

Just leave a comment on her blog post and you're in for a chance to win!!

I'll be back tomorrow with this week's JUGS challenge!!!  Until then - stay warm, and have a great night!

January 23, 2010

Tweet Tweet ...

Happy Saturday!!

When I started this week, it felt like it would never end -- and then suddenly POOF!  Here we are at the weekend.

Saturday's here on my blog are devoted to some of my favorite ladies...the Just Us Girls Challenge team.

Today's challenge is a 3-D template challenge, and this week WE HAVE A SPONSOR!!  Lauren Meader has graciously offered to be our sponsor this week!!

So, for one lucky participant, you will receive a $25 gift certificate to My Time Made Easy, just for playing along!  Make SURE to post a link to your project on the Mr. Linky on the Just Us Girls blog to be eligible to win.

As a BONUS -- Lauren has shared some new product with the DT this week, and you all get to see some sneak peeks from Lauren's upcoming release on 2/1.

So, without further adieu, here's my project for this week:


I used the Happy Mail template, and made it a little bird house.  I had seen some cute birdhouses that were in the shape of a mailbox in Lancaster, PA a while back...very cute stuff.

That pretty patterned paper on the box and the card are from Love Notes, a new collection of digital papers that will be released, and that adorable birdie is from the "Critters With Heart" stamp set.  This is a super cute set -- perfect for little treats for your little ones and their classmates -- and not just for valentine's day -- they're great for all occasions - birthday, just because, thinking of you...

Go take a look at what the rest of the DT has made, as well as our Guest designer, Gabby Arriaza...they're all done an incredible job with this new template!
We're off to do a little shopping (nothing FUN, just food and that kind of boring stuff - lol) and then out to dinner with some of the greatest people I know tonight!  Looking forward to it.

Have a great day...and thanks for stopping by!!

 
Supplies:
Stamps: Critters With Heart (My Time Made Easy)
Ink: Memento Black
Paper: So Saffron, Aqua Mist, Floral pp from Love Notes (MTME)
Accessories: MS border punch (double loop), pearls, flower punches, white chiffon ribbon

January 21, 2010

Somebuggy Loves You...

Hey everyone :).

Happy Thursday -  this week, for the Pink Cat Release, I thought I'd play along with the ladies over at the Color Throwdown.  I've been wanting to play along forEVER - and finally today, I've done it :).

Melissa has some really CUTE images this week -- take a peek:

My first card features that cutie pie lady bug, and uses the colors for this week's Throwdown.  The BG on my base layer is actually a digi background image that is already available over at PCS.  I just changed the color of it, and printed it on my CS.  The sentiment was also printed right on my base layer -- I laid them out on my screen, and printed it all out together -- easy peasy.

I've added some dimension to the lady bug, popping up her wings, the flower she is holding, and her antanne. 
I added some Ripe Avocado twill and filled in the sentiment with liquid pearls to finish it off...

Up next are the robots!

You can tell these two are in love, can't you??  lol.  Instead of "You Complete Me" I made the sentiment "You Compute Me"  I thought it was fairly clever...even for me - ha ha.


This is a large card - it measures 5.5x5.5.  The patterned paper is from Scenic Route, it complemented the robots nicely - and it provided my color scheme.  Finishing touches on this one are some buttons in the lower right corner.

Please be sure to check out the rest of the DT's blogs - their links are in m right hand side bar ------>

I'll be back on Saturday with the latest JUGS challenge!  Be sure to come back by then!!

Until then...


Supplies:
Somebuggy Card:
Stamps: Digital Images from Pink Cat Studio
Ink: none - GASP! lol
Paper: Rasperry Fizz, Old Olive, So Saffron, Whisper White
Accessories: Circles nestabilities, dimensionals, Ripe Avocado twill ribbon, liquid pearls


Robot Card:
Stamps: Digital Images from Pink Cat Studio
Ink: none
Paper: Real Red, Old Olive, Whisper White, Scenic Route Patterned Paper
Accessories: Buttons

January 19, 2010

Sharing in her sorrow...

A friend of mine recently lost her Dad to Cancer.  UGH.  I've heard it too many times, and watched it happen in my own family, and I just HATE IT.  It's such an UGLY word.

My Uncle passed away from complications of Lung Cancer in April of 2007.  I'll never forget our visit the day before he passed...I still remember the look he gave me -- I think he knew it would be the last time we would see him.

Anyway - this isn't about me -- this is about my friend.  I know that it was a long road full of good times and bad.  I want her to know that I'm thinking of her - and know that I'm praying for her and her family.


I have the SU! set, Thoughts and Prayers...and the sentiment "Sharing in your Sorrow" is BEYOND perfect, as I DO share in her sorrow -- not only because I am familiar with what her family is going through, but because it brings back all of those memories, and brings me back to that moment in time.  I hope that in time, she will be able to reflect on all that was good about such an awful experience.

Some details about the card -- The base layer is Spring Rain, from PTI.  I sponged some blue craft ink (and a little bit of green) around the edges.  I stamped a flourish from PTI's Fancy Flourishes set on a piece of vellum, and then laid it over my white layer, and used it as a piercing guide, to make this beautiful flourish trail from the butterfly.

You may recognize that butterfly from Lauren Meader's All a Flutter© set.  I stamped it, and cut it out - since I left the laptop upstairs -- and was too lazy to go get it to open up SCAL - lol.  I layered it on some vellum CS, and then dressed it up with some adhesive pearls.

Please keep hope they will find a cure, and in the meantime those who need to, have the strength to fight the fight.

Thanks for stopping by!


Supplies:
Stamps: All a Flutter (MTME), Fancy Flourishes (PTI), Thoughts and Prayers (SU!)
Ink: Bashful Blue Craft, Celery craft, Basic Gray 
Paper: Spring Rain, Select White (both PTI)
Accessories: adhesive pearls (Kaiser & Recollections), MS Big Border punch, Spring Rain Satin Ribbon

January 18, 2010

Today's Public Service Announcement...

If you find yourself wanting to fix your daughter's closet organizer...DO NOT use your craft pliers to bend the metal bracket...I repeat...DO NOT use your craft pliers -- the following result may occur...


YEOUCH.  That hurt -- a lot. I said a lot of bad words under my breath too.  Of course - my husband has a TON of tools, many of them a lot more appropriate to use in this circumstance, but I was just too impatient, and certainly paid the price for it...however, this is not the only reason I am here today...

I have a card to share with you :)

I've got another My Time Made Easy project to share today...I was playing with my Cricut Expression, and saw that on the "Stretch Your Imagination" cartridge that I have, one of the functions is 'card'.  It will take each image, and make some sort of window cutout on a card of all of them...I thought this one looked so pretty - I had to make a window out of it.


The patterned paper is from My Mind's Eye Bloom & Grow collection, I just love the bright happy colors on these! 


You'll see the butterfly up top was made using one of the wing pattern images from the All a Flutter© set, and the Flutters and Flowers© pretty pieces die cuts.  Let me tell you -- SO EASY!  I've become a VERY lazy papercrafter, lol.  These little diecut pieces are terrific to use as accents -- you will really love the one of the outline.  With SCAL and your Cricut Expression, the possibilities are ENDLESS!!!  I shopped around for Sure Cuts Alot, and found the BEST price on the web at Candacraft.  Pop on over, and if you buy there - let her know where you came from.

If you're wondering what that sparkle is on the butterfly - I broke out some bling bling foil I had in my stash.  I stamped the wing pattern in versamark, then applied heat & stick powder...heated it, and then applied the foil -- fun effect.

This wonderful sentiment is from All a Flutter Sentiments©.  I stamped it on some So Saffron CS, and used my Double Ended Tags die - it fits PERFECTLY :).

To complete the card, I added some vellum behind the cutout in the front --  gives it a real softness, don't you think???

Thanks for stopping by today -- hope you had a great weekend -- I (as usual) can not believe it is over already -- they go WAY too fast!

Until next time...Thanks for stopping by!! 


Supplies:
Stamps: All a Flutter, All a Flutter Sentiments (My Time Made Easy)
Ink: Basic Gray, Versamark
Paper: Bermuda Bay, So Saffron, My Mind's Eye Bloom and Grow Collection, Vellum CS
Accessories: Cricut, Stretch Your Imagination Cartridge, bling bling foil, adhesive pearls, raspberry fizz grosgrain, Double ended tag dies (Spellbinders)

January 16, 2010

Have you ever...

Just felt like your creativity was totally drained??  I was talking to my friend Lauren earlier today, saying how I felt TOTALLY uncreative.  I was faced with the JUGS challenge for today, and was DREADING it, because I really have been stuck in a rut.  I get into grooves sometimes, where the ideas just FLY, but there are other times when I sit and just STARE at all the goodies laid out before me, and get....well....nothing.

Then I went to my trusty computer, and took a look at the challenge before me once more...these colors...hmmmm....


and I suddenly felt a little twinge.  It was strange...like a spark maybe...and all of a sudden, I started to see a layout in my head, layers, texture - WHAT?!?!?!  it was CREATIVE thought! lol.

Now -- I will admit- I goofed off...sort of.  Before I made the card (yes, I really did wait until tonight to do it...I just couldn't make anything earlier this week) I watched the movie "What Happens in Vegas"...have any of you seen it??  It's with Ashton Kutcher and Cameron Diaz...I have to say, I liked it.  Made me chuckle, made me smile, and of course -- the happy ending...I'm a sucker for a happy ending, you know.  But it's main theme is LOVE...which FINALLY brings me to my card (I'm sure you were wondering if I'd EVER get here - lol).

I decided I would take these delicious colors that Kristin gave us to play with this week, and make a valentine card...I may give this to my Dad to give to my Mom for Valentine's day...what do you think???


So, if you get the chance - see the movie -- it's light-hearted and sweet with some funny rolled in...maybe a good movie to watch with that special someone on Valentine's day even :).

Now -- go check out what the rest of the girls have made this week -- all I can say is WOW!!
Supplies:
Stamps: Heart Prints (Papertrey Ink)
Ink: Bravo Burgundy, Versamark, Basic Gray
Paper: Bravo Burgundy, Basic Gray, Blush Blossom, Vintage Cream
Accessories: D'Vine Swirl embossing folder, Basic Gray chiffon ribbon (SU!), dimensionals, clear EP, Nestabilities Labels 1 dies

January 14, 2010

Lily in a pile of hearts...

Hey there!

It's Thursday -- which means it's Pink Cat Studio Day!!! 


Melissa has some more super adorable Valentine's images releasing today -- be sure to go check them out here!


I thought this image of Lily in the pile of hearts was SO cute -- and wouldn't you know it??  I had some cute hearts confetti, PERFECT for a shaker card with this image!

I got to work, coloring my image, adding some glitter here and there with some stickles.

When I went to my 'adhesive drawer' I found that I had no more foam mounting tape - ACK!!! but -- it just so happens that I HATE to waste stuff, so I save the sheets of dimensionals even if they're all used up, I will sometimes cut apart the border to use a small piece of it for little things on my cards...the rectangle was perfect to go around Lily...so I doubled  them up, added my confetti, and my frame, and the shaker was ready.


I kept with the colors that I used in my image, Green Galore for my base, and chocolate chip for the mat layer.  I stamped the sentiment (from Michael's $1 bin a few years ago) in fresh snow ink.  To jazz it up just a little more, I added some hot pink bling, matching the raspberry frame, down the center of my ribbon.

So I see that Valentine's Day is on a Sunday this year...anyone making special plans???  Hubby and I don't really go out much anymore -- we'll probably fix a nice dinner, and maybe watch a movie with the girls...

I'll be back Saturday with another Just Us Girls Challenge!!  Stay tuned....


January 10, 2010

Pink Cat Studio - Paper Piecing!

Good Morning!!!

The birthday party was quite the adventure, but all of the kids had a great time - and Shannon LOVED getting to play with some friends she hasn't seen in a while...so the day was DEFINITELY a success!

I'm popping in to tell you about a NEW product available over at Pink Cat Studio!  Melissa has been hard at work perfecting paper piecing files!  These fun projects are great for card making, scrapbooking and any kind of 3D crafting. The project files are formatted for those who like to cut and paper piece by hand and for those who have an electronic cutter.


SUPER cute images are available RIGHT NOW so be sure to go check them out!!

 
Melissa is also having a fun contest and the winner will receive a $50 gift certificate to the PCS rubber or digi store! To enter the contest you will download a free Paper Piecing Project and then make a fun craft with it, anything you like. So not only will you get to try a Paper Piecing Project for free, you could also win some  PCS goodies.

Visit the PCS blog today to find out about how to enter the contest and get your free Paper Piecing Project.


How cool is THAT???  I know I could EASILY spend $50 in Melissa's store, so why not give it a shot??  I'd love to see what you come up with too!


Have a great day everyone!


January 9, 2010

Just Us Girls Technique week!

Happy Saturday!!!  YEAH!

It was a loooooong week back at work after having been off for a week and a half - lol.

It's Saturday, so it's time for another Just Us Girls Challenge.  This is the 2nd Saturday of the month, which means it's time for a technique.  And wouldn't you know???  My card also fits this week's Crazy 4 Challenges Challenge, which is to make your project 'Birthday Themed'.

Mona Pendleton is our lovely host this week - and here's her challenge:

 I have a sewing machine, but I'm certainly no PRO...but I was glad to get this challenge, as I always tell myself I should sew on my cards, and then never do.

So, I broke out my machine, as well as my needle and embroidery thread, and got to work.  I used the stem image from PTI's Women of Life.  I stamped it in cream, used my paper piercer to make my stitching holes, and then got stitching away.


Topped off the stems with some felt flowers from Stampin' Up!.  I sewed on the tiered satin ribbon ruffles, and finished off the front of the card with some polkadots in Raspberry Fizz, and a sentiment from Damask Designs (PTI) in fresh snow ink.

I had an argument with the sewing machine...and the machine won.  Looks like that will be something I will have to work on tomorrow -- but for now, my card is finished, and I'm happy for that.

Head on over to the rest of the teams' blogs to check out their FANTABULOUS creations -- I just LOVE Gabby's card this week -- sooooo fun!
So come on -- faux stitiching is allowed too, so no excuses - come play!  Link your creation on the Mr. Linky, over at the JUGS blog, and if you are uploading to any online galleries, be sure to use they keyword JUGS15.


I'll be entertaining 6 6 year olds today...we're making our own pizza's for my daughter's birthday...wish me luck!  Looking forward to seeing what YOU create this week!  We really appreciate all of our followers, and anyone who comes out to participate!!!


January 6, 2010

Butterflies all Around...

As promised, I'm back today with some more goodies from Lauren Meader's new store, My Time Made Easy.  With the opening of the store, she has released her very first STAMPS - I must tell you, they are GREAT to stamp with, the very same quality you are used to with all of the popular acrylic stamp companies.  They are easy to line up, and sheesh, they are just so darn cute!

The sentiments are in some fun fonts, and although they appear delicate, they stamp quite nicely, and CLEARLY.

I can honestly tell you, I just LOVE the All a Flutter template, and not just for the 'box'.  I have 2 projects to share with you today that show other ways you can use that beautiful butterfly.


This first one is a sympathy card I made for a friend, who suddenly and unexpectedly lost her brother just before Christmas.  I think this sentiment is perfect, knowing her faith, and therefore knowing that her brother has something far better ahead of him.  I thought the warm sunny colors would bring a sense of warmth and happiness to celebrate the man her brother was, and will be in their hearts forever.  God Bless and keep him always.

-------

This next project is something FUN and FUNKY for a teen.  GREAT colors, with this fun sparkly DP from Piggy Tales' La belle et la bete colection.  The paper behind the buterfly is SU!'s Razzleberry, stamped with some swirls from Lizzie Anne Designs.


LOOK at how perfectly that sentiment fits on that large Nestability label die cut.  PERFECT.  The frame is one of three that I got in a pack for $2.50 in the Target $ spot over a year ago, I just trimmed it with some Razzleberry swiss dot ribbon (I used the 'back' side), and accented the corners with some fabulous bling by Doodlebug.

--------

Now, my LAST project, utilizes another GREAT product being offered by My Time Made Easy.  The Pretty Prinatbles line is just TERRIFIC!  Especially the Color Me Pretty papers.  TOTALLY customizable, whether you print on colored CS, or print on white, and color it in, which is what I've done here.  HELLO???  THINK of the possibilities!

My inspiration for this project came from this fun cording I found on clearance at Target right after Christmas.  I couldn't get a really good photo to show you just how cute this box is, but trust me, in person, it truly shines -- very vibrant, and perfect for that teenage girl in your life! 


I started out printing my black with white dots paper, and colored it in with some fun bright colors.  I then cut out some 4" circles with my Cricut Expression ( this is becoming an INVALUABLE tool for me, I must admit!)  and cut them to place on my Shutt-erfly template

Speaking of the Cricut - Sure Cuts a Lot is FABULOUS!  While in the program, I opened the .svg for the Shutt-erfly template, and then the solid butterfly from the Flutters and Flowers Pretty Pieces Accents, and placed it right where I wanted it on my template.  No muss, no fuss, and PERFECT cuts!  Brilliant.  Just Brilliant. lol.  The flower on the top of the box is also from Flutters and Flowers, and is such a nice addition, don't you think??


I'm so glad you could stop by today, I truly do appreciate an feedback you might have for me - I'm always looking for ways to improve, or just to know that you like what you see...lol.  Tell me -- what so far, is your favorite product from Lauren's new store???  the templates??  the papers??  the stamps???  Curious minds (mine in particular-heh heh) want to know!

Until next time...thanks for stopping by!!


Pink Cat Release TODAY!!!

Hey all -- I had hoped to have another project ready for the release today, but unfortunately, my little one is sick -- so I was hanging out with her this evening, and didn't get an opportunity to finish my project up.  If she's feeling a little better later on, I'll try to finish it up and get it posted.

In the meantime though -


Melissa has a bunch of new digi images releasing today - as well as some rubber, so head on over to the store, and FILL UP THAT CART!  lol.

Be sure to stop by the rest of the DT's blogs as I know many of them have got lots to share with you today!!

Thanks for stopping by, and happy shopping!

Pink Cat is BACK - and with a contest too!

It's been a while since Melissa over at Pink Cat Studio has had a release.  She gave us lucky girls some time off for the holidays!  In that time, she was cooking up some SUPER cute lovey dovey images for us to all drool over.

She's coming out with new images tomorrow, and some coordinating sentiments/additions!  Now, don't you fret, a good number of them will be available in rubber as well...such as the one I am about to share...

I gave a brief little peek of this card last week, on my daughter's birthday, as it is the card I made for her this year. 

Aren't those pixies just SO cute???  Since Melissa included this cute birthday sentiment, I figured I'd put it to good use.

I usually try to incorporate the age of my girls on their cards...I'm not sure why, but I always have for as long as I've made them cards, so I'm trying to stick with tradition I guess :).

For this card, I found a fun bold font on my computer, and typed the 6, and placed my cupcake and pixies image over it slightly.  Then printed and colored it, and turned it into what you see here.

That fun paper down the left side of the card is from My Minds Eye, the Bloom and Grow Collection...I've had it since May, and have FINALLY started using it on some projects.

My cardstock colors are Raspberry Fizz, New Leaf and Bermuda Bay (Stampin' Up!)  I've been using Bermuda Bay a lot lately, in fact, you'll see another project with it tomorrow - lol.  I used a border punch (apron lace) on a strip of CS for that 'ribbon' and glitzed it up with some bright pink jewels...

Here's a pic of it with the birthday girl - she was proud to show it off:

NOW -- I hope you've stayed with me, as here comes the contest part!

Pink Cat Studio is introducing some new Pixie characters this Thursday and we are having a contest to celebrate!
The Pixies have picked out their own pixie names and you have to guess which names they picked. Visit the Pink Cat Studio blog to read the contest details and enter the contest.


So - be sure to head over to Melissa's blog to find out how to enter!!!

You'll also want to check out what the rest of the PCS team has been up to...take a look at these girls:
Thanks for stopping by today -- I'll be back tomorrow - stay tuned!!


January 2, 2010

The Day Has Come...


Can I get a WOO-HOOOOOOOOO for Lauren?!?!?!

The My Time Made Easy™ store is officially OPEN for business!!!  Releasing and available TODAY are the following:

Pretty Impressions© Stamps:
All a Flutter©
All a Flutter Sentiments©

Pretty Printables© Digital Paper:
Fluttering-by©
Shutt-erfly©

Pretty Packaging© Templates:
All a Flutter©
Shutt-erfly©

and Pretty Pieces© Accents:
Flutters and Flowers©

I'm going to try and keep this short and sweet, as I know there's been a LOT to look at today. LOL.  I've got 2 projects to share with you today, both feature new templates and stamps being released to day at My Time Made Easy.


First up is this cute All a Flutter© tote and card to coordinate.  For the tote, I used some chocolate card stock, and the circles pattern from the Pretty Printables© papers.  I have my Cricut Expression with the SCAL software (I bought mine at Candacraft) and let me tell you - I literally had this put together in less than 10 minutes.  Yes, REALLY.  And, you can see that it holds quite a bit...there are 4 travel sized bath & body items in here.  I gave this to my daughter, and she giggled with delight :).  I added the handle, and now she carries it around the house -- probably more than I would like her to - lol.

I made a card to coordinate...the sentiment is from All a Flutter Sentiments©, I stamped the outline image of the butterfly from the All a Flutter© set, and carefully cut out the inside of the wings (I used hole punches for the circles, the 1/8" and 1/16" work perfectly!) and layered it on a piece of the circle paper. The main layer is another pattern included in the Pretty Printables© papers.  Kristin really did a fabulous job on all of these papers, you won't be disappointed!


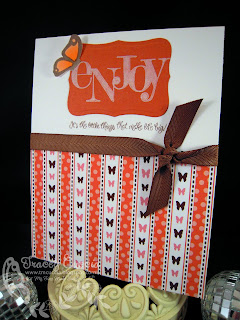
My next ensemble uses the new Shutt-erfly Pretty Packaging© template.  This time, I used this great butterfly striped paper, and used rust and white as my main colors.  I colored in the wings on the butterflies used in this project.  "It's the little things that make life big!"  I can see myself using this sentiment a LOT.  I'm trying to teach my girls that it's not always about presents or expensive extravagant things, but that it's the little things, like spending time together, and enjoying each other that is important.  Oh - and cookies.  Cookies are important ;).  The cookies you see in the photo are Ricotta Cheese cookies.  My friend's Mom passed along the recipe (I've made a seperate post below with the recipe), and they are tasty!  Quite a few fit in this box, perfect for gift giving!

This time - I cut the template from the polka dot paper included in the Butterfly Pretty Printables© and used the "wrong side" of the paper for the outside, so what a nice surprise to see the inside of the box lined with polka dots, and the wings on the closure of the box too!


This time, I made my card using the box as my inspiration piece.  The 'Enjoy' was stamped on a piece of rust cardstock in white craft ink.  I picked up this cute Heidi Swapp Alphabet set on clearance at M's last week for $4!  How can you beat THAT???  And it came in handy for this project, so it was DEFINITELY justified ;).

Well -- that certainly didn't turn out to be a short and sweet as I thought it would be, but I did try...

I'll be back later this week, with ANOTHER few samples with new release items from My Time Made Easy, and a little somethin' from Pink Cat Studio - her first release of 2010!

Be on the lookout!


MMMMMMM....Cookies, made with Ricotta Cheese?!?!?!


Indeed they are...and they are YUMMY.  Hee hee --

My friend Sue and her hubby had us over for dinner last weekend, and had some of these cookies that her Mom made for Christmas.  I kindly begged for the recipe, and couldn't wait to make them for my very own.  My hips, on the other hand, would have been happier not knowing how easy these are to make ;0).

Here's the recipe, for those who are interested:

Ricotta Cheese Cookies
 
1 Cup of softened butter
 
2 cups granulated sugar
 
15 ounces ricotta cheese
 
3 tsp. vanilla extract
 
1 tsp. salt
 
1 tsp. baking soda
 
4 cups flour
 
Preheat oven to 350.
 
Mix all ingredients well, until dough sticks together in a big ball.  It will be very sticky.  Drop by teaspoon full onto an ungreased cookie sheet.  Decorate with sprinkles if desired.  Bake 10 minutes or until the bottoms turn golden brown.  Let cool for one minute & then transfer to wire racks to cool completely.

Enjoy!!

A Just Us Girls Sketch Challenge!

HAPPY NEW YEAR!!!!  I'm hoping everyone started off the year in a happy fashion.  We celebrated Shannon's birthday - and spent a quiet evening home together.  We watched the ball drop in Times Square, shared a smooch, and then called it a night.  Gone are the days of partying until the wee hours of the morning - lol.

We had a quiet day for the first of the year, and I think that's a good way to start it off. 

But, enough about me -- it's time for a Just Us Girls Challenge!

This week, our hostess is the lovely Lisa Kind.  She came up with this great sketch to work with:


 I decided to combine it with this week's Stamp TV color challenge, of pink, brown, and white. 


Unfortunately, I think I got a little too close to the embossing powder with my heat gun, and the sentiment is a little messy, but I'm still lovin' this.  Some of my favorite colors, combined with this fun sketch -- how can you lose?

I hope that you get a chance to play along this week - I'd love to get the chance to see what you do with the sketch.

Thanks for stopping by week after week, and checking in.  Be sure to see what the rest of the team has come up with -here are some links to get you started --

 and our January Guest Designer Gabby Arriaza

stay tuned...the grand opening of My Time Made Easy is coming soon!!!!! ;).