Hey all -
I know I said tomorrow - but figured I wouldn't wait, this may help answer some questions.
Given the WONDERFUL
big news from Pink Cat Studio, we want these digi-images of Cowboy Ethan and Cowgirl Ava to sell BIG, so if any of you have ANY concerns about digital stamps, I'm hoping to put you at ease.
Never given digi-stamps a try?? It's really not so bad. I use Photoshop Elements 7 for all of my photo and digi-scrapping/stamping needs, but there are great free programs like
Picasa, or I know some of my colleagues on the Dustin Pike DT even use MS Word to drop their images into...
This can be super easy, or if you know your way around your photo editing software, you can make it more 'interesting' if you will.
Basics:
You've got this file - now what?
Download your file, and save it someplace you will remember. I have a folder named "Digital Stamps" and then sub folders by company "Pink Cat Studio", "CC Designs", "Dustin Pike" etc. That way, when I go back to print out again, I know EXACTLY where to look.
Go ahead and open your file. If you have photo software, great, if not, that's ok too, you can open up the image in the picture viewer, copy it and paste it into Word, or another word processing program.
You can go ahead and print right now...wasn't that easy? I thought so ;).
Now, you certainly CAN get more involved and actually layer images together -- such as my Ethan and Ava card shown
here. I liked how when I use the .png files with transparent backgrounds, I'm able to place the images
right next to one another. At this stage, I can also add a drop shadow it's kind of fun, to get the images to pop off the page a little...if you tried this with a jpeg, or another file without a transparent bg, you'd have a white 'box' around the image.
Let's see, do you want to know some COOL things about digi stamps??
- you can flip your images, make a mirror, without having to use that special mirror stamp ;)
- you can RESIZE your images to compliment your project. Larger or smaller, it's all up to YOU.
- you can build a scene, without masking...can you IMAGINE??? Yep - the beauty of digi stamps...
You want to put some images together??? Sure! I'll show you how I do it...I don't claim to be an expert, but figure I'll share with those who may want to know more. For the purposes of showing you how you can build a scene, I'm going to use a background image from Dustin Pike, along with Cowboy Ethan and Cowgirl Ava.
So - here's my background:
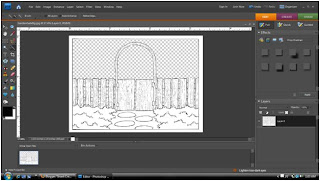
(click on thumbnails for a larger view)


Isn't that cute? See the 'checkered' area?? That's all transparent, so anything you 'layer' with it, will not be blocked by the background (I haven't lost you , have I?? I hope not...I'm trying not to be too wordy...
OK-- so, you've got your background, and you want cowboy Ethan to be outside of the gate... open up Ethan, copy him, and paste him into your 'scene...it will look like this:
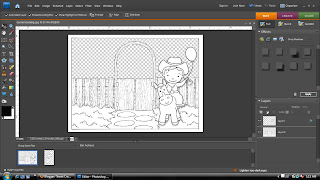
(notice that tiny bit of drop shadow?? ) If you look on the right of the screen shot, you'll see the 'Layers' of my scene. Layer 0 is the background...Layer 1 is Ethan. These are independent from one another -- think back to old school animation --same kind of principle...now onto the next step...let's add Cowgirl Ava, and have her coming up to the gate, from behind it...
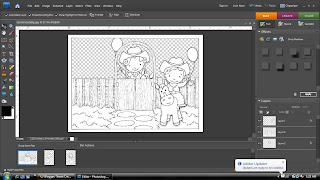
(oh hey -- look I have an update! -- sorry about that) If you take a look over at that layers palette on the right -- you'll see the order top to bottom is 1-0-2. By putting layer 2 at the bottom, it layers it
behind the background - putting Ava behind the gate, on her way to meet Ethan for a ride together. Now you can print and color -- all set!
I use an inkjet printer - no need to have a laser printer, though if your printer does not have a pigment cartridge, I've heard spraying your image with a sealer, or heat setting will help if you experience running when coloring. I have a pigment cartridge and color with Copics, and have never had an issue with running at all.
That wasn't too bad, was it?? I've never written a 'tutorial' before, so hope I didn't make things too confusing. Please feel free to post any questions you might have, I'm more than happy to answer as best I can.
One last thing before I go --
Have you gotten an image where the background wasn't transparent??? This is how I 'fix' my images (and again, not the only way, or even perhaps considered the 'right' way, but it works for me ;) ).
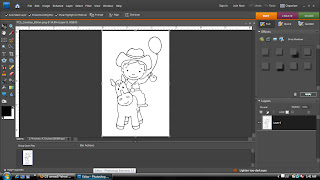
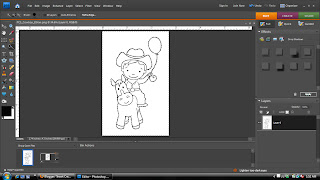
Here's Ethan - with the white Background...on the layers palette -- you might see a lock on the layer -- I double click on that, and it unlocks the layer, and you can change this, instead of adding other layers, etc. The next thing you'll do, is click on the 'Quick Selection Tool' (In PSE7 it looks like a little magic wand with a dotted box at the top). You'll see along the top of the screen, that you can change the size of the brush -- as well as some other items, like a deselect tool, in the event that too much of the image gets selected.
Now what you'll do, is click in that white space surrounding the image -- keep clicking, until it looks something like this:
Then head up to the menus up top -- click 'Edit' then 'Cut'. And POOF! Your image will look like this:
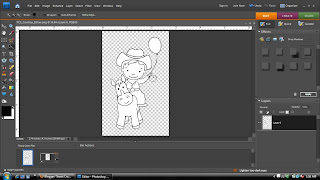
Recognize that checkered bg?? Now all you need to do, is click, 'File', then 'Save As...' and select .png as the file type. Then you're all set! Build your scenes, or just print your individual images...either way - HAVE FUN with it.


